How to Deploy and Configure the DellEMC UnityVSA 5.3?
Dell EMC UnityVSA (Dell EMC Unity Virtual Storage Appliance) is a unified Software Defined Storage (SDS) solution that runs atop the VMware vSphere platform. Dell EMC UnityVSA provides a flexible storage option for environments that do not require dedicated storage systems such as test/development or remote office/branch office (ROBO) environments. Users can quickly provision a Dell EMC UnityVSA on general-purpose server hardware, which can result in reduced infrastructure costs and a quicker rate of deployment.
Both existing and new users can benefit from the Dell EMC UnityVSA. Existing users can utilize existing third-party server hardware in their test/development or ROBO environments, while new and curious users can use the Dell EMC UnityVSA to try out newer functionality as well as APIs before purchasing a physical system.
DellEMC UnityVSA Single-SP Community Edition
Dell EMC UnityVSA Community Edition is a free product that includes all features without any expiration. The Dell EMC UnityVSA software package, videos, and guides can be downloaded through the Dell EMC Unity Community forum. Support is also provided through the Dell EMC Unity Community forum, where inquiries and discussions with other Dell EMC UnityVSA users are encouraged. There is a 4TB storage capacity and 2-core CPU with 12GB memory limit on the Community Edition and it can only be used for non-production use cases.
DellEMC UnityVSA Single-SP Deployment
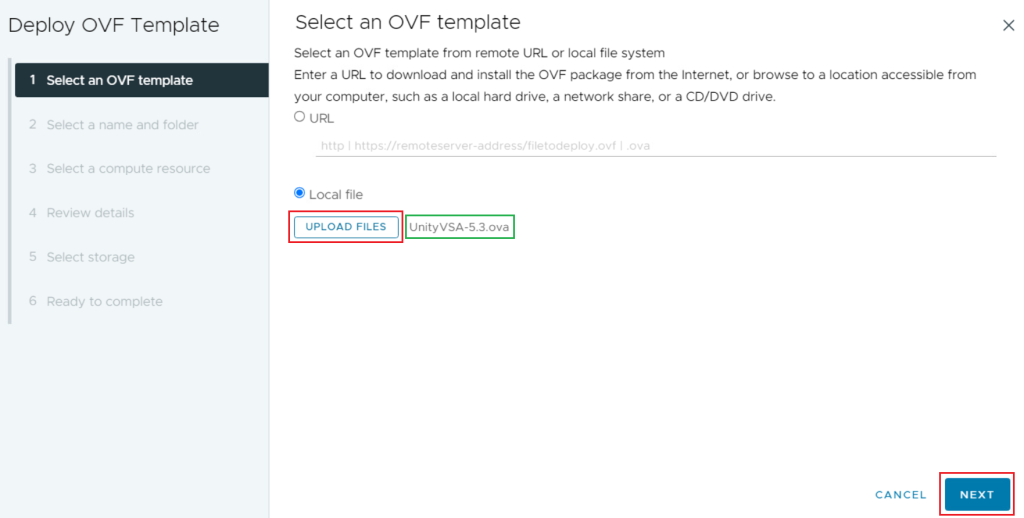
Dell EMC UnityVSA Single-SP is delivered in the form of an Open Virtualization Appliance (OVA) template and can be deployed on VMware vSphere ESXi. To download UnityVSA 5.3 use this Link or you can download directly from this Link, and after the download is completed follow the below steps to deployment.
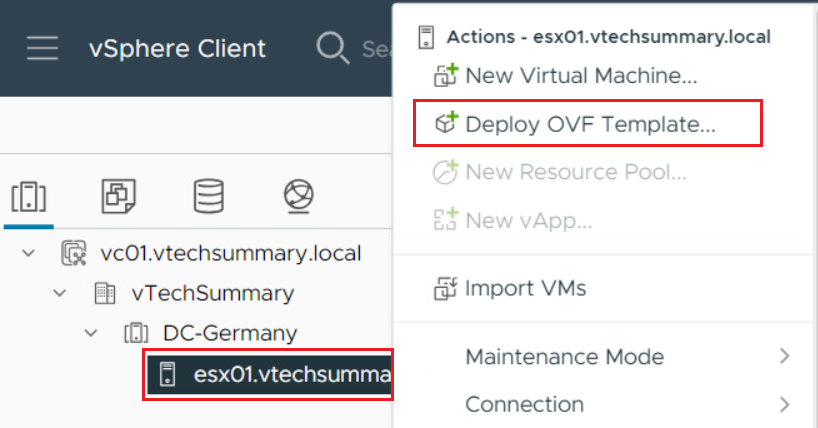
Step 01. Navigate your ESXi console or vCenter console and select Deploy OVF Template.
Step 02. Through the Upload Files button select the UnityVSA downloaded file and click Next.
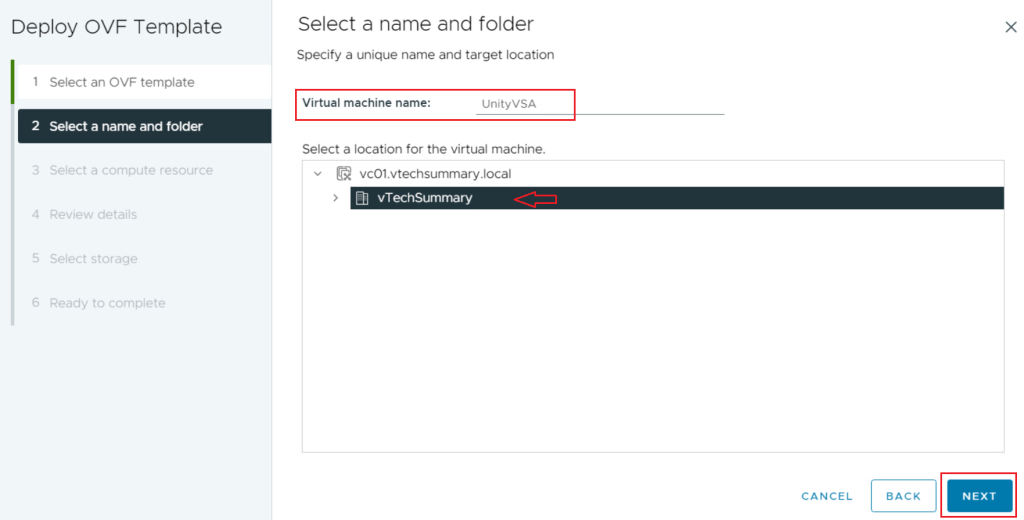
Step 03. Write a Name for the VSA and select a location (folder) in the Infrastructure, then click Next.
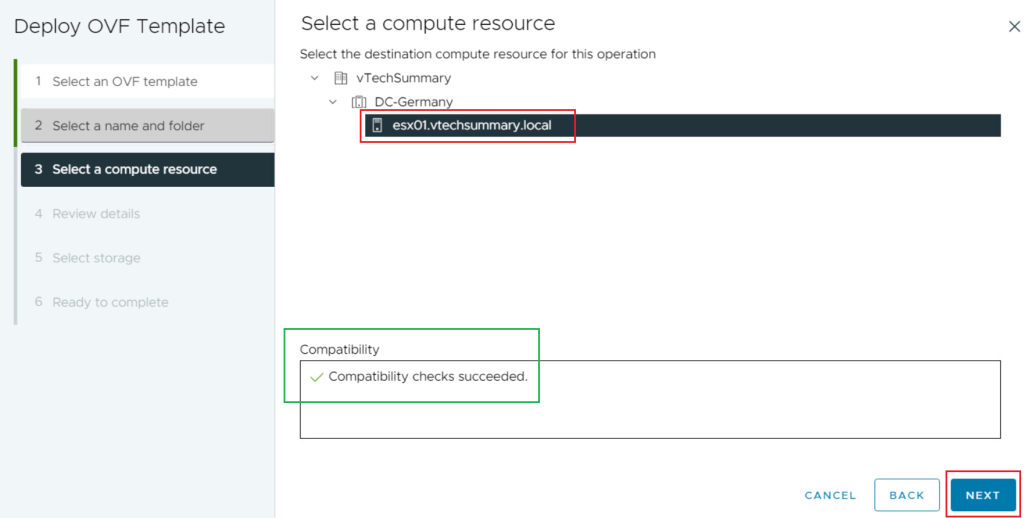
Step 04. From the wizard now choose which ESXi Host is associated with the VSA appliance and click Next.
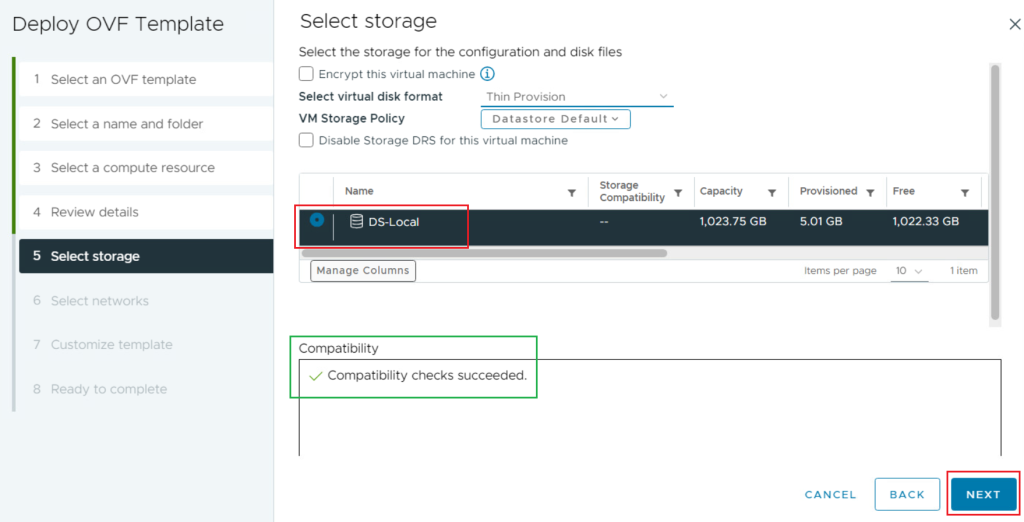
Step 05. In the storage section select an existing Datastore where to deploy the UnityVSA and click Next.
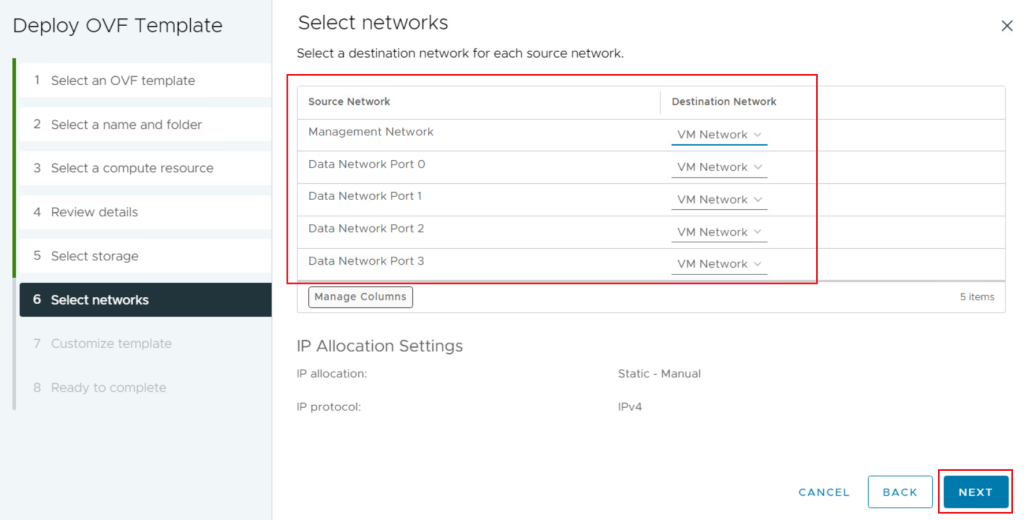
Step 06. In the Network section the wizard the VSA configuration the option to create 5 different networks. One is used for the Management of the Unity VSA. The others will be used to provide network connectivity from the Unity VSA storage. Click Next.
- Network adapter 2 → Management Port
- Network adapter 3 → Ethernet Port 0
- Network adapter 4 → Ethernet Port 1
- Network adapter 5 → Ethernet Port 2
- Network adapter 6 → Ethernet Port 3
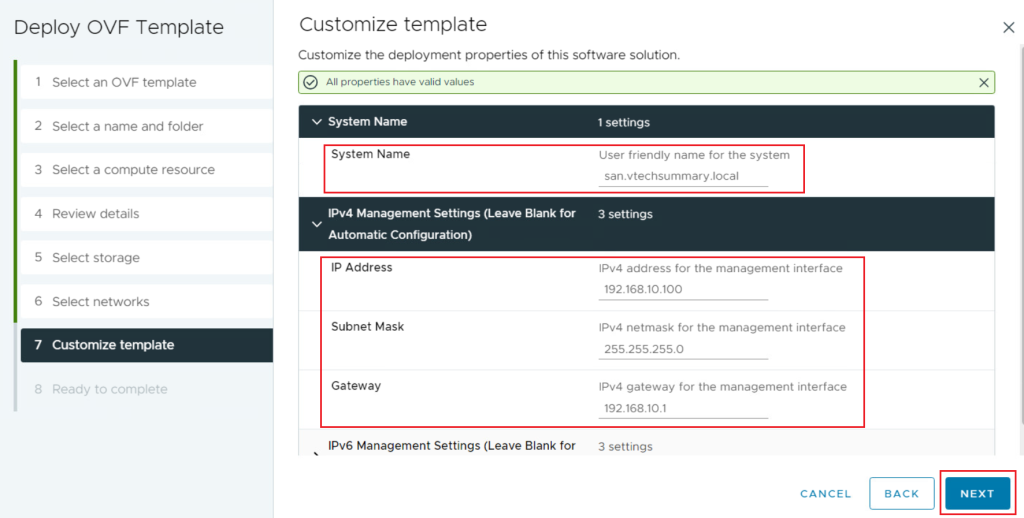
Step 07. As a last step, there is the option to customize the Unity VSA settings like Management IP address and System Name. The recommendation is to use a static IP Address and create the required DNS (A) and (PTR) records serving the FQDN name resolution both ways and click Next.
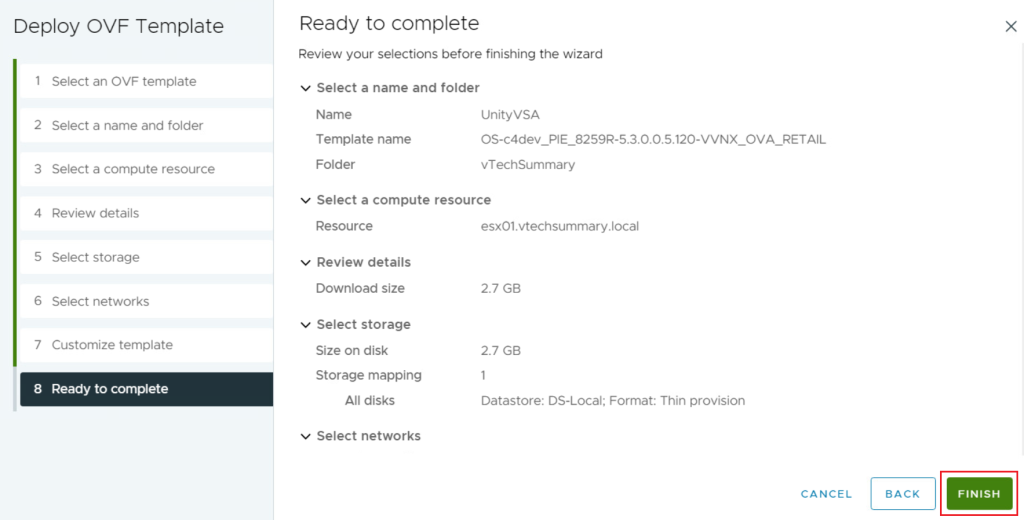
Step 08. At this point, the wizard has collected all the information to customize the OVF template and deploy the Dell EMC Unity VSA appliance. Click Finish.
Initial Boot
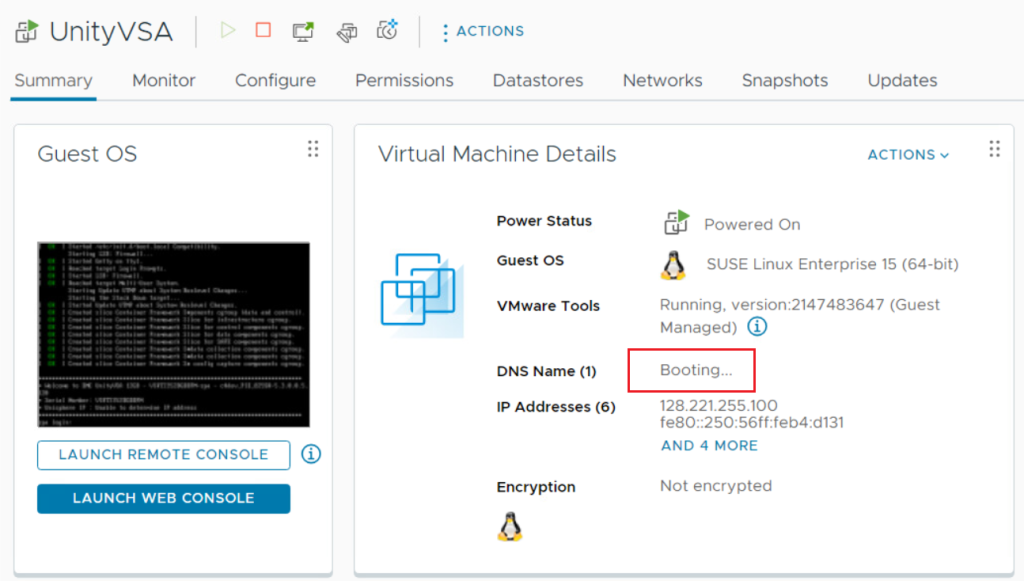
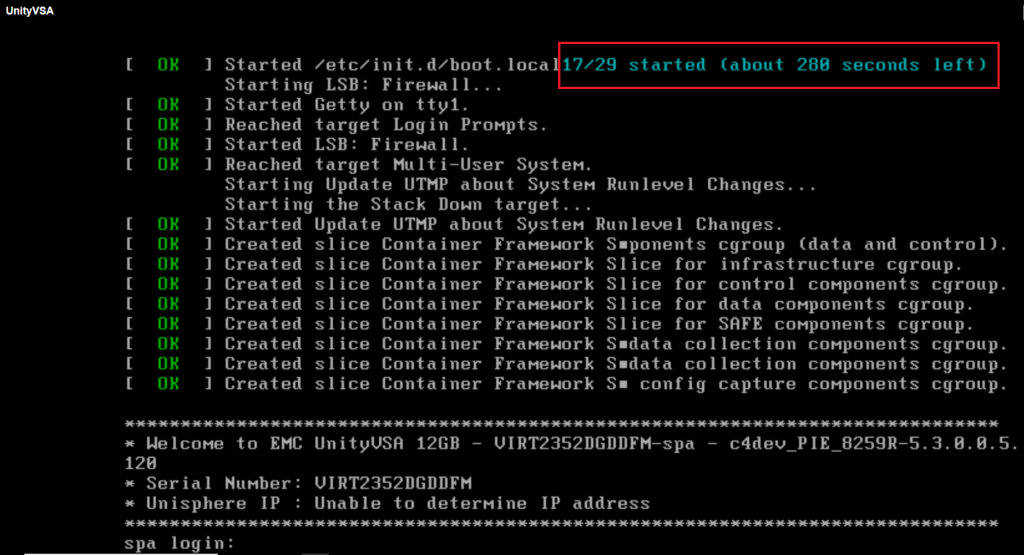
After provisioning is complete, the Dell EMC UnityVSA Single-SP VM can be powered on for the first time. Do not make any changes to the VM, such as changing the virtual hardware configuration (CPU, memory, NICs, and so on), as this causes Dell EMC UnityVSA Single-SP to boot into service mode to prevent invalid configurations. The time it takes for the initial boot will vary depending on the infrastructure, especially the datastore performance capabilities. This process can take between 30 to 60 minutes. You can monitor the boot status in the Summary tab for the VM. The DNS Name shows “Booting” while the VM is starting up as shown in the below Figure.
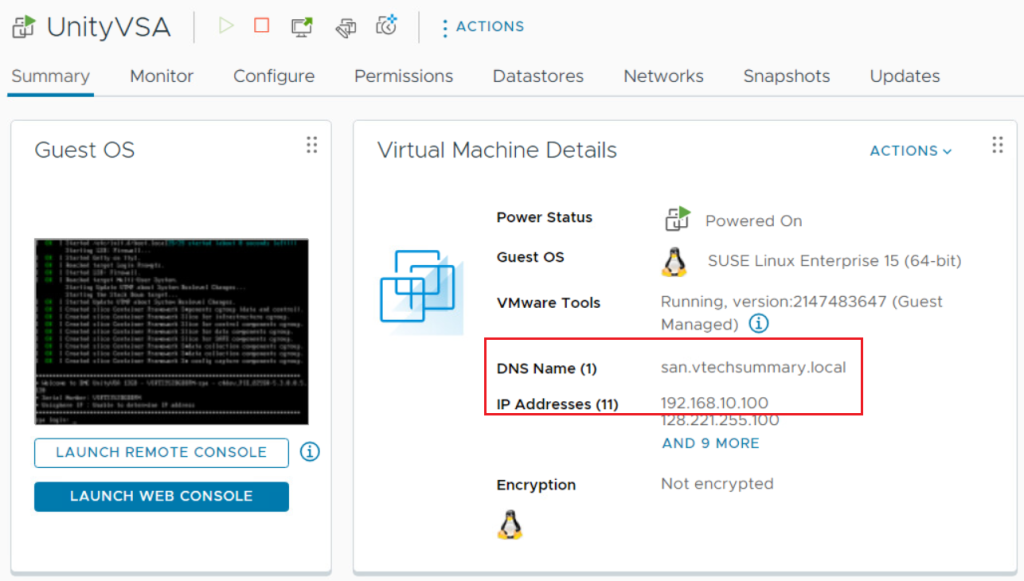
Once the boot process is complete, the DNS Name is updated to display the system name. If no system name is defined, this defaults to the serial number. If an IP address was already configured during deployment, Unisphere on Dell EMC UnityVSA is now accessible.
https://192.168.10.100
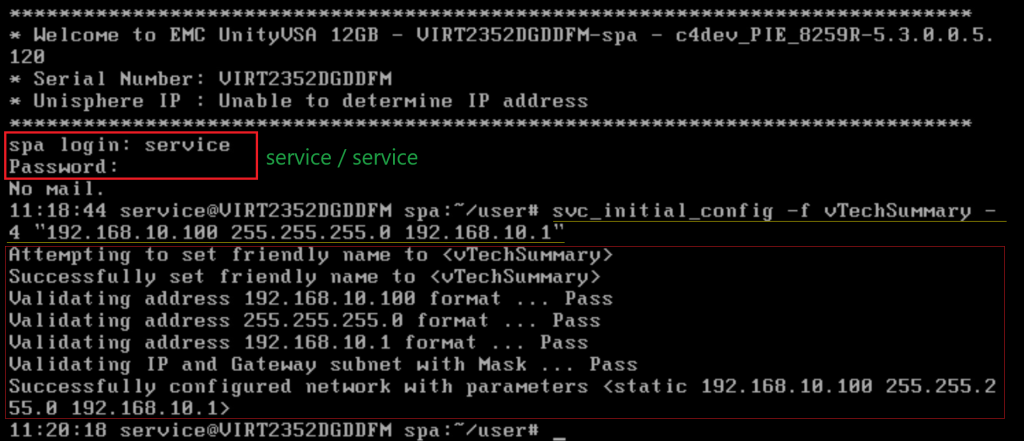
If you can’t access the UnityVSA console OR if Dell EMC UnityVSA Single-SP is deployed without a vCenter server, an IP address cannot be assigned during deployment. In this case, once the system has fully booted, it can be configured using the VMware Console:
Step01. Open the console for Dell EMC UnityVSA Single-SP and login with the default credentials: service/service. Once logged in, run:
svc_initial_config -f <Hostname> -4 “<IPv4 Address> <IPv4 Netmask> <IPv4 Gateway>”
for Example: svc_initial_config -f vTechSummary -4 “192.168.10.100 255.255.255.0 192.168.10.1”
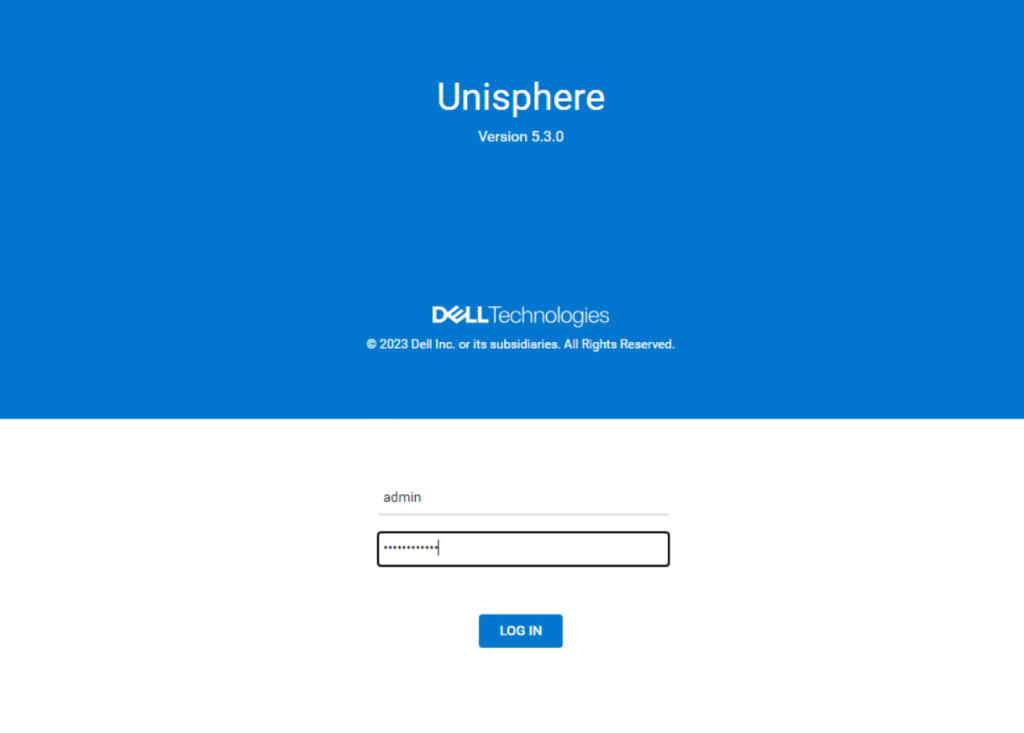
Unisphere on Dell EMC UnityVSA is now accessible. You can login to Unisphere using the default credentials:
https://192.168.10.100
Username: admin
Password: Password123#
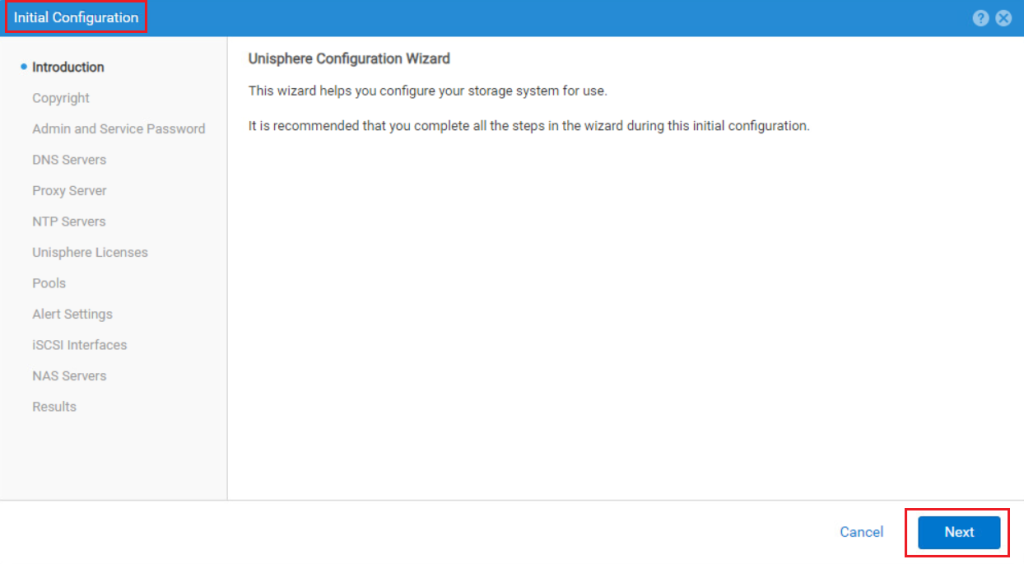
Initial Configuration Wizard
When logging in for the first time, the Initial Configuration Wizard appears and guides you to:
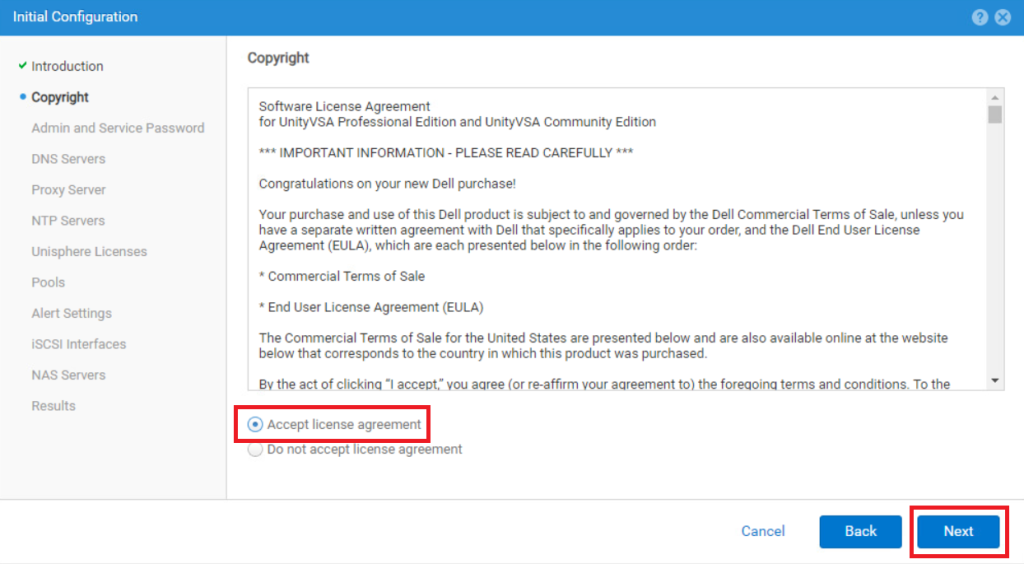
Accept the License Agreement and click Next.
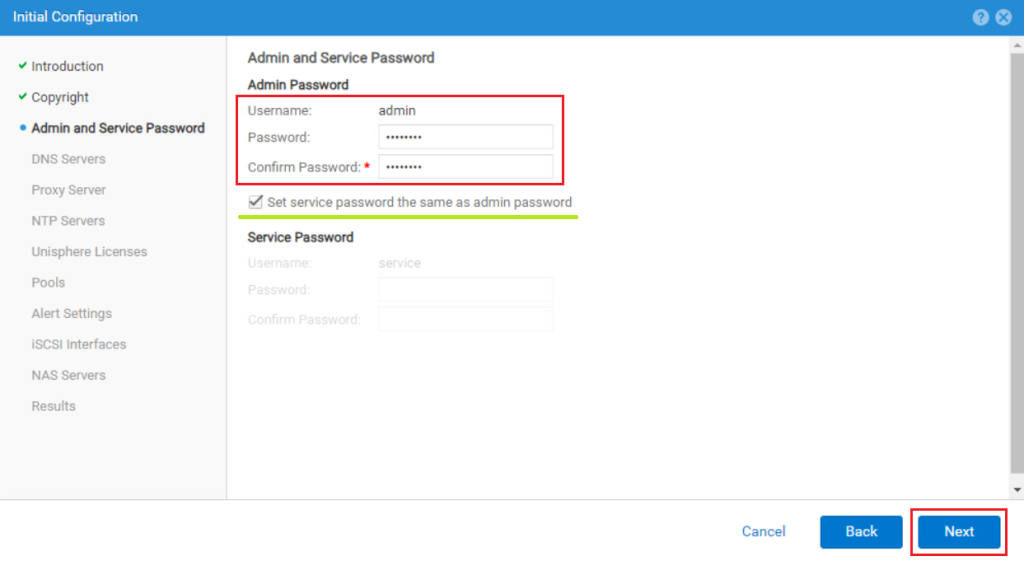
You can change the default admin password and also to create a new one for the service account. Click Next.
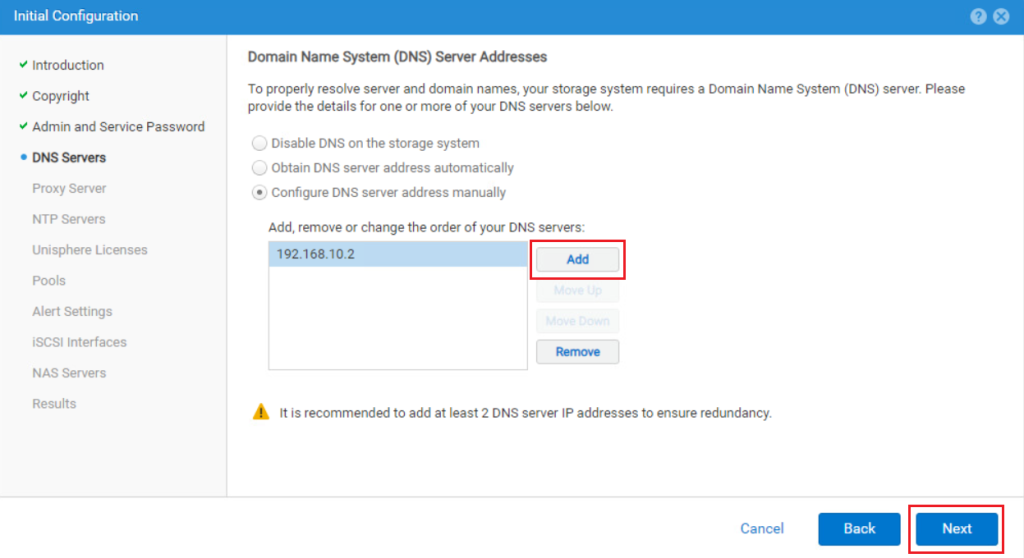
The next step is to provide multiple DNS servers when available.
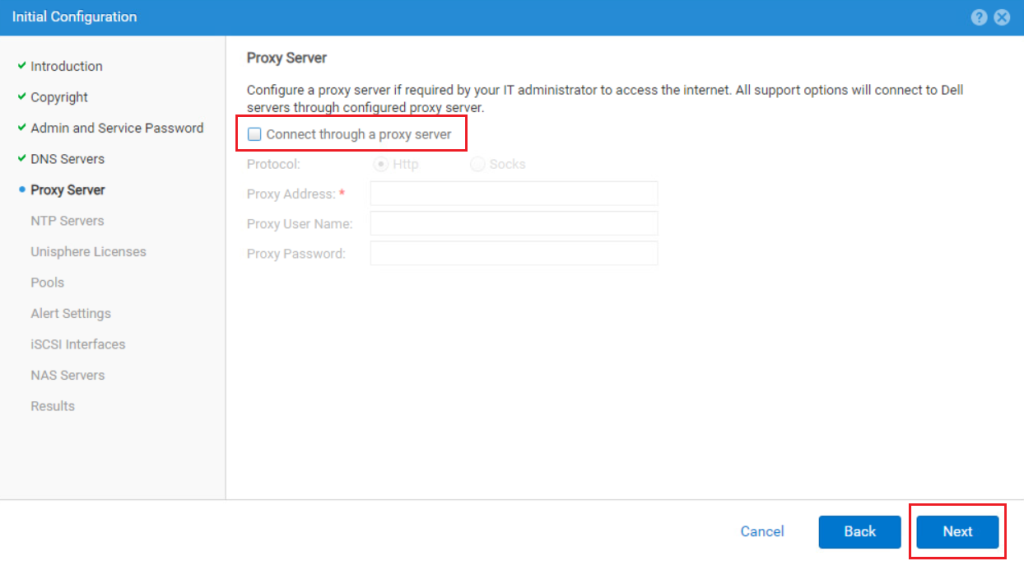
Configure a Proxy server if required by the Administrator to access the Internet and if you don’t need leave it black and click Next.
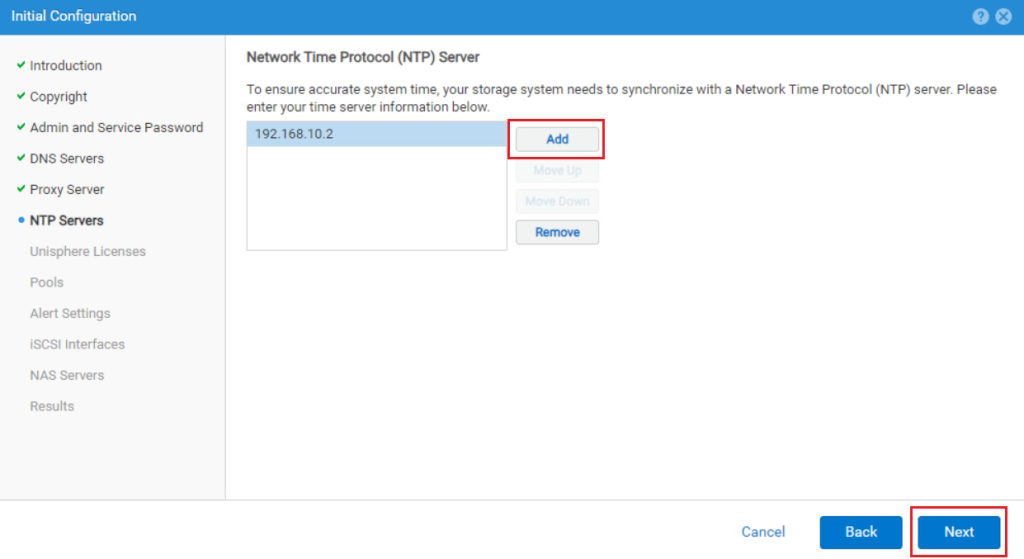
Add one or two NTP servers to ensure accurate system time and click Next.
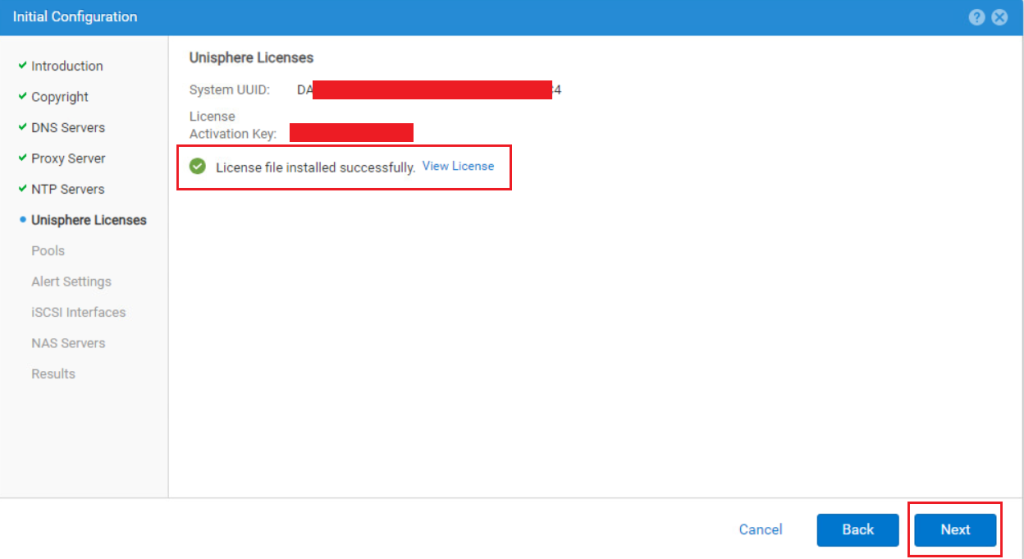
In the Unisphere licenses take a copy of the System UUID generated by the installation process. This UUID will be associated with a single license of the Unity VSA Community Edition which allows up to 4TB of Storage for free. Eventually, it is possible to extend the storage required to higher capacities with the Professional Editions and using the same installation.
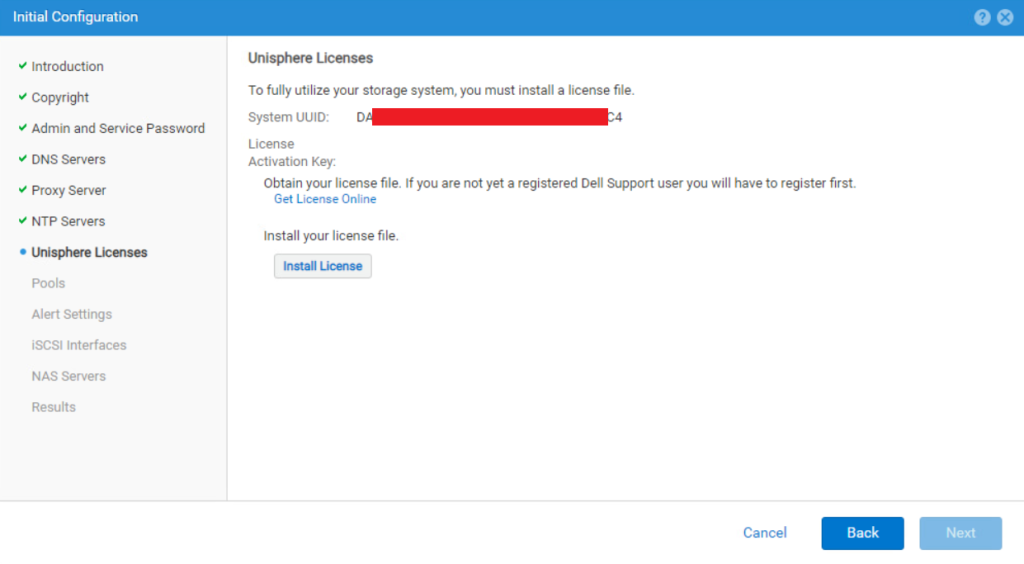
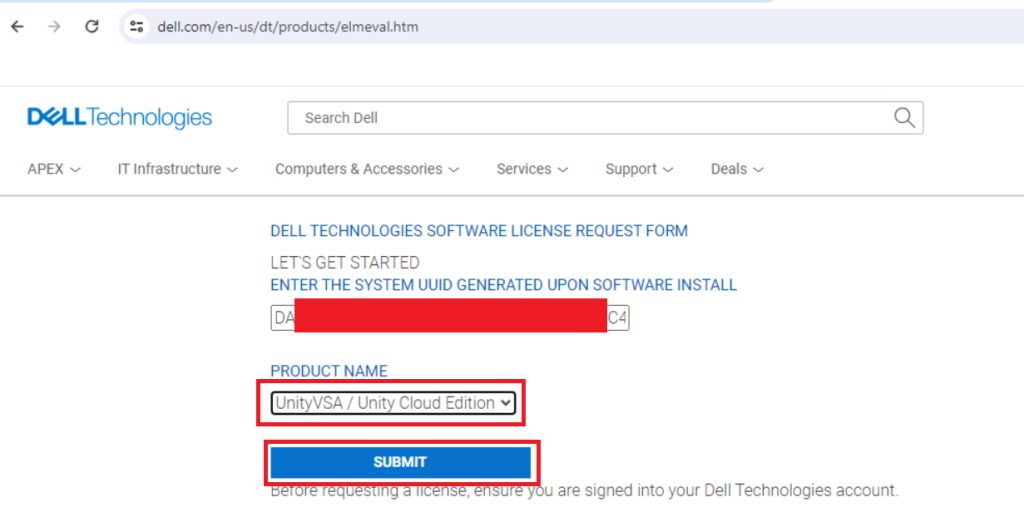
Login in the Link provided from the Unisphere GUI paste the System UUID, and select UnityVSA as a product and click Submit.
https://www.dellemc.com/en-us/auth/elmeval.htm
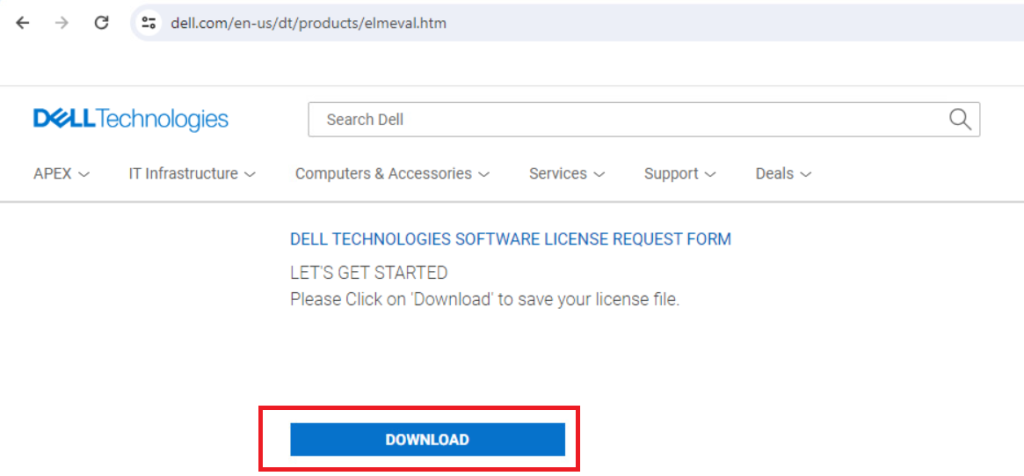
After a few seconds you can download the generated License file. (*.xml)
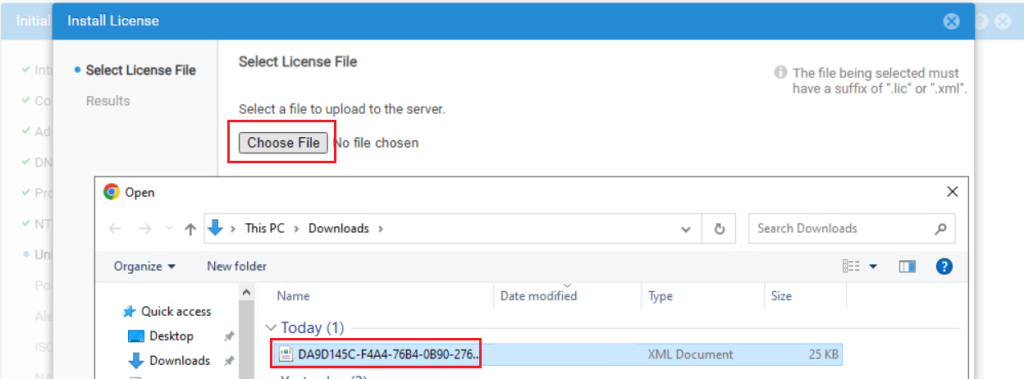
Back to the Unisphere console and select Install License.
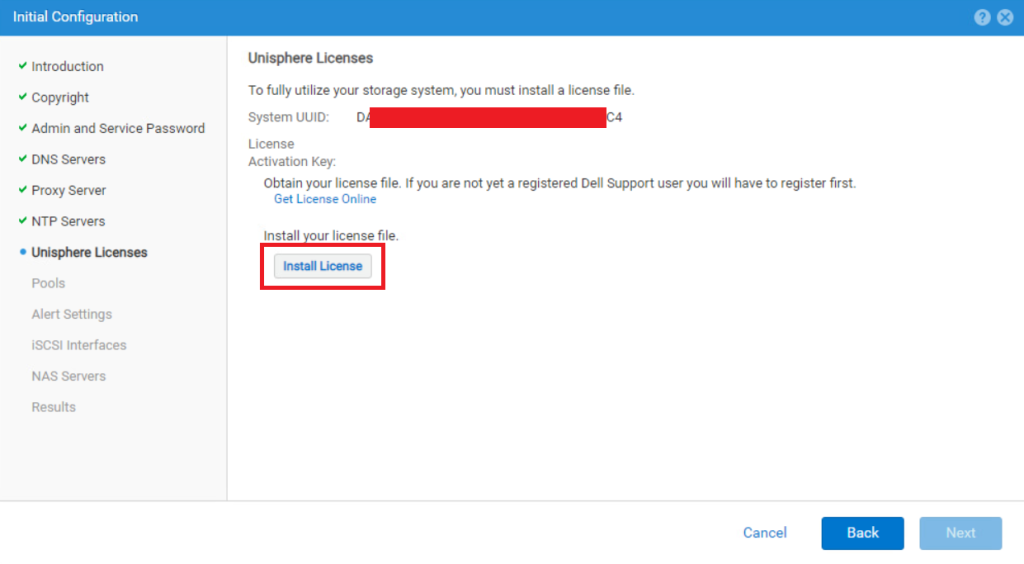
Navigate the download path and select the License File. (*.xml)
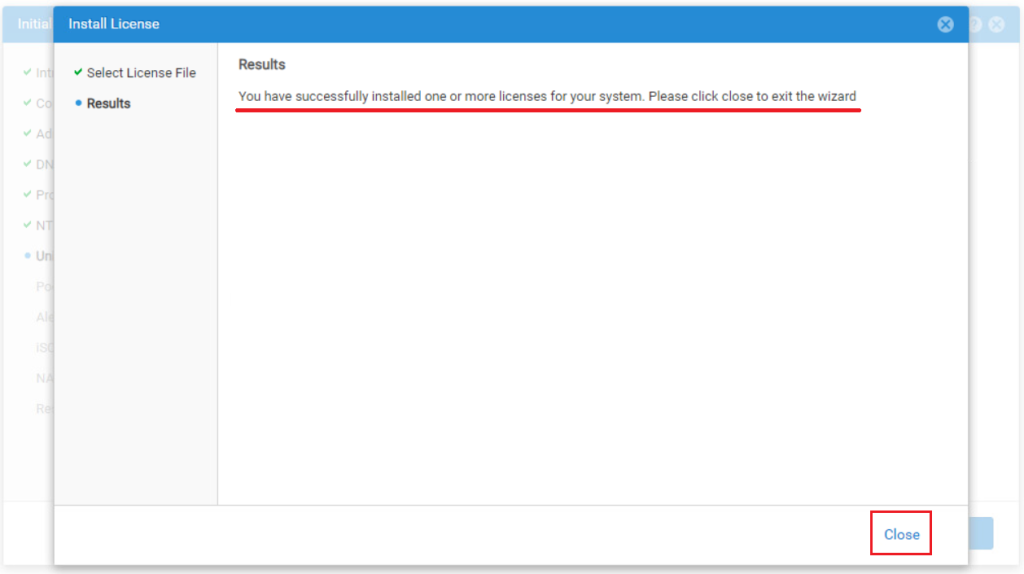
The DellEMC UnityVSA is now Licensed.
Also in the Initial Configuration Wizard, you can configure the Pool, Alert Setting, iSCSI Interface and NAS Servers or you can leave them blank and later configure those. Click Close.
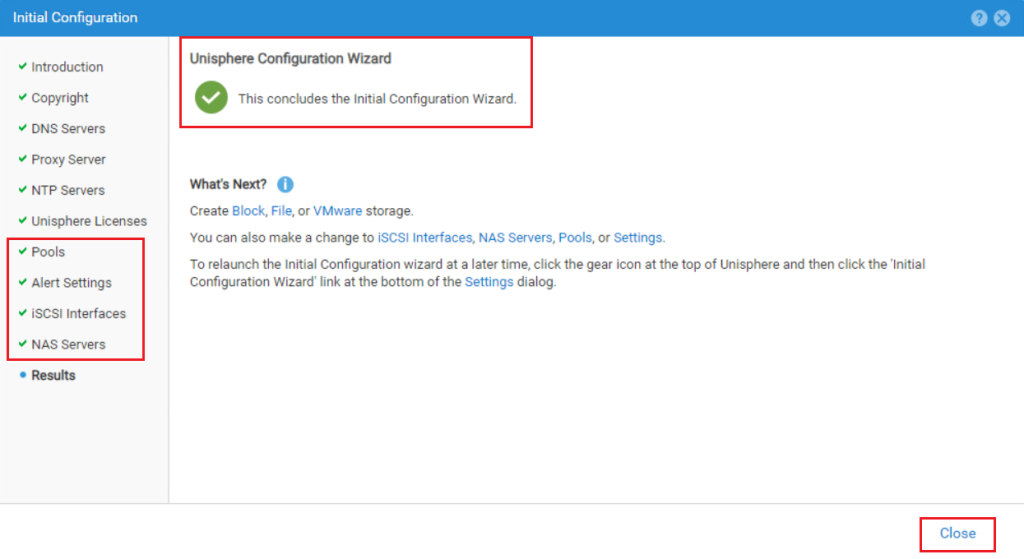
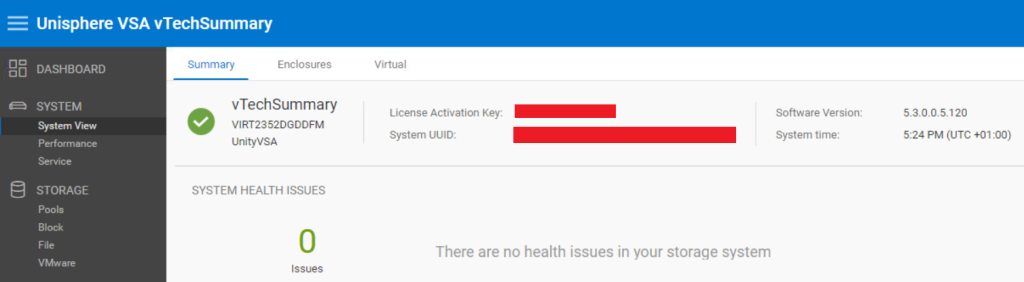
Now you see the UnityVSA dashboard and it is ready for use and configuration.
Follow us for more Content about DellEMC UnityVSA configurations.